Blending Sounds: Teaching Tips + Free Printable
This post may contain affiliate links. As an Amazon affiliate, we earn from qualifying purchases.

Learn all about continuous blending, the research-backed way to teach the blending of sounds! This strategy will help kids learn to blend sounds effectively and read words quickly and accurately. Read, learn, and get a FREE printable practice sheet!
What Is Blending?
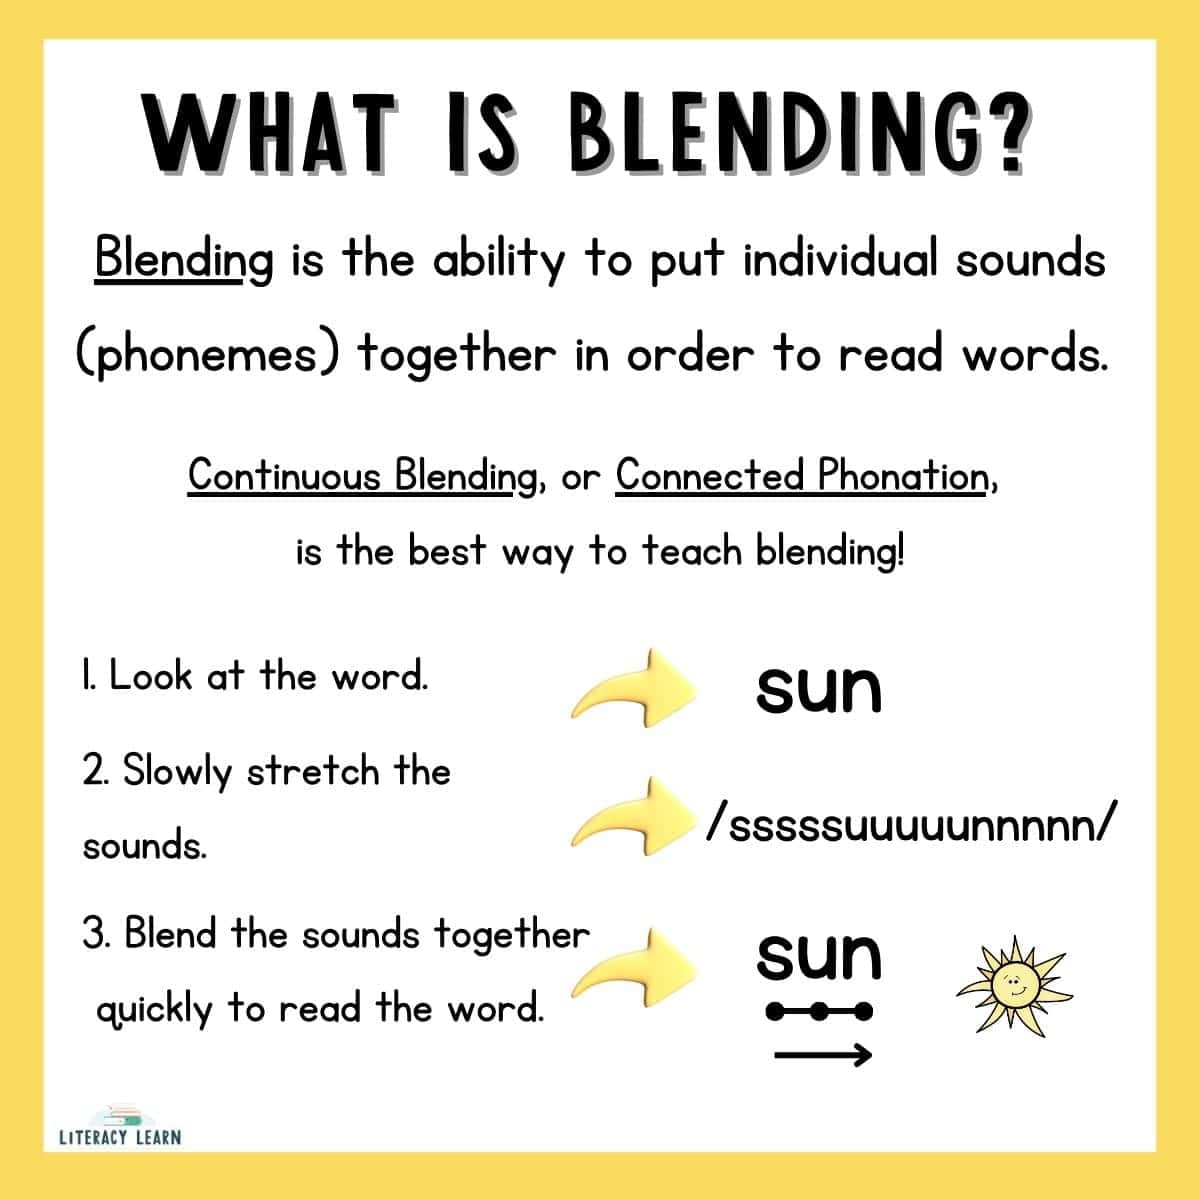
Blending is the ability to put individual sounds (phonemes) together in order to read words. The process of blending sounds to decode words can be tricky for many children.
💭 Think about this process:
- First, the brain must recognize the letters: c-a-t.
- Next, it must instantly match each letter to its corresponding sound: c=/c/, a=/a/, t=/t/.
- Then, kids must blend those sounds together, in the right order: /c/+/a/+/t/.
- Finally, they need to recognize the word they’re trying to read: cat.
Our brains have to do a lot of hard work in order to blend sounds together to read words! And this whole process needs to happen almost instantly for kids to become efficient and fluent readers.
A Better Way to Teach Blending
We often try to teach blending in various ways, but the research rooted in the Science of Reading is clear that the BEST way to teach blending is by using a strategy called continuous blending.
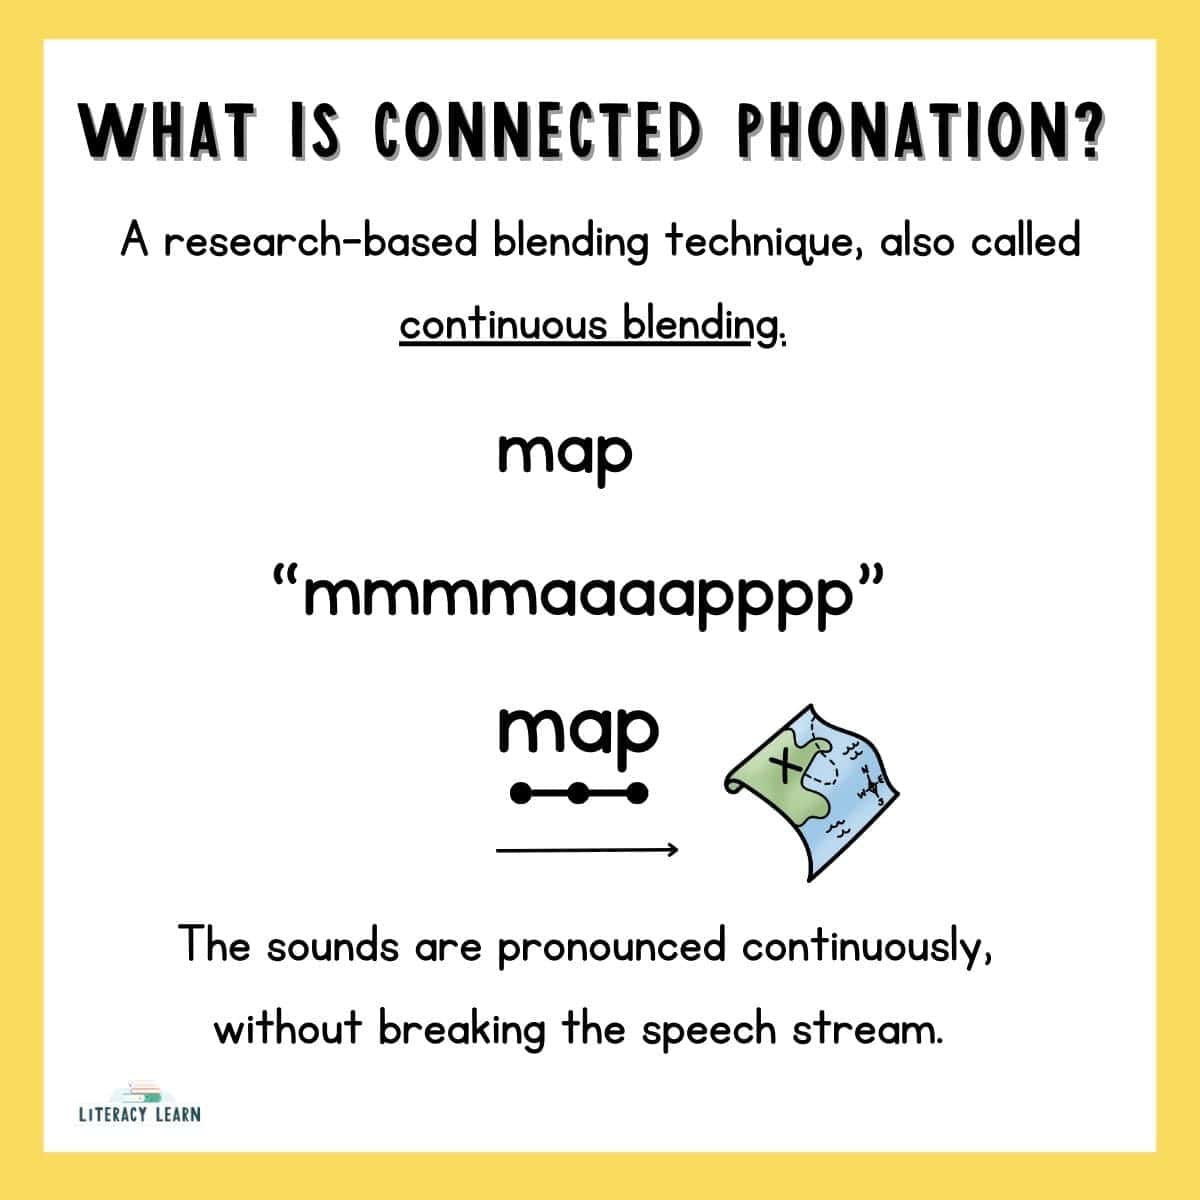
This is also called connected phonation.
Connected phonation, or continuous blending, is saying each sound in a word without stops between. For example, when they see the word map, we want them to “sound it out” like this: /mmmmaaaapppp/ = map.
There are no pauses or breaks between the sounds.
When teaching connected phonation, kids should hold each sound and connect them. We can think of it as stretching the sounds together in order to read the word.
A study by esteemed reading researchers Dr. Linnea Ehri and Dr. Selendid Gonzalez-Frey (2020), found that connected phonation is a more effective strategy than segmented phonation (tapping sounds with pauses between). A more recent case study (2025) affirmed the same findings.
The results of both studies concluded that kids who were taught connected phonation for blending words were better and more effective decoders than the others who were taught different strategies. 💡
Getting Started
- You may want to start with 2 phoneme Vowel-Consonant words like ‘at’ or ‘in.’ Nonsense words like ‘ip’ or ‘en’ work well too! Once kids master blending two sounds, then move to 3 phoneme CVC words.
- Use continuous sounds at the beginning of words, so that the sounds flow easily from one to the next. Continuous sounds include: /f/, /l/, /m/, /n/, /r/, /s/, /v/, and /z/. You’ll notice how connected phonation works beautifully when stretching these sounds.
Teaching Tips
We’re sharing some suggestions and best teaching tips to help your students master blending!
Develop Phonological Awareness Skills
For kids who are struggling with blending sounds, you will need to assess their phonological awareness skills to see if they blend sounds orally (without letters).
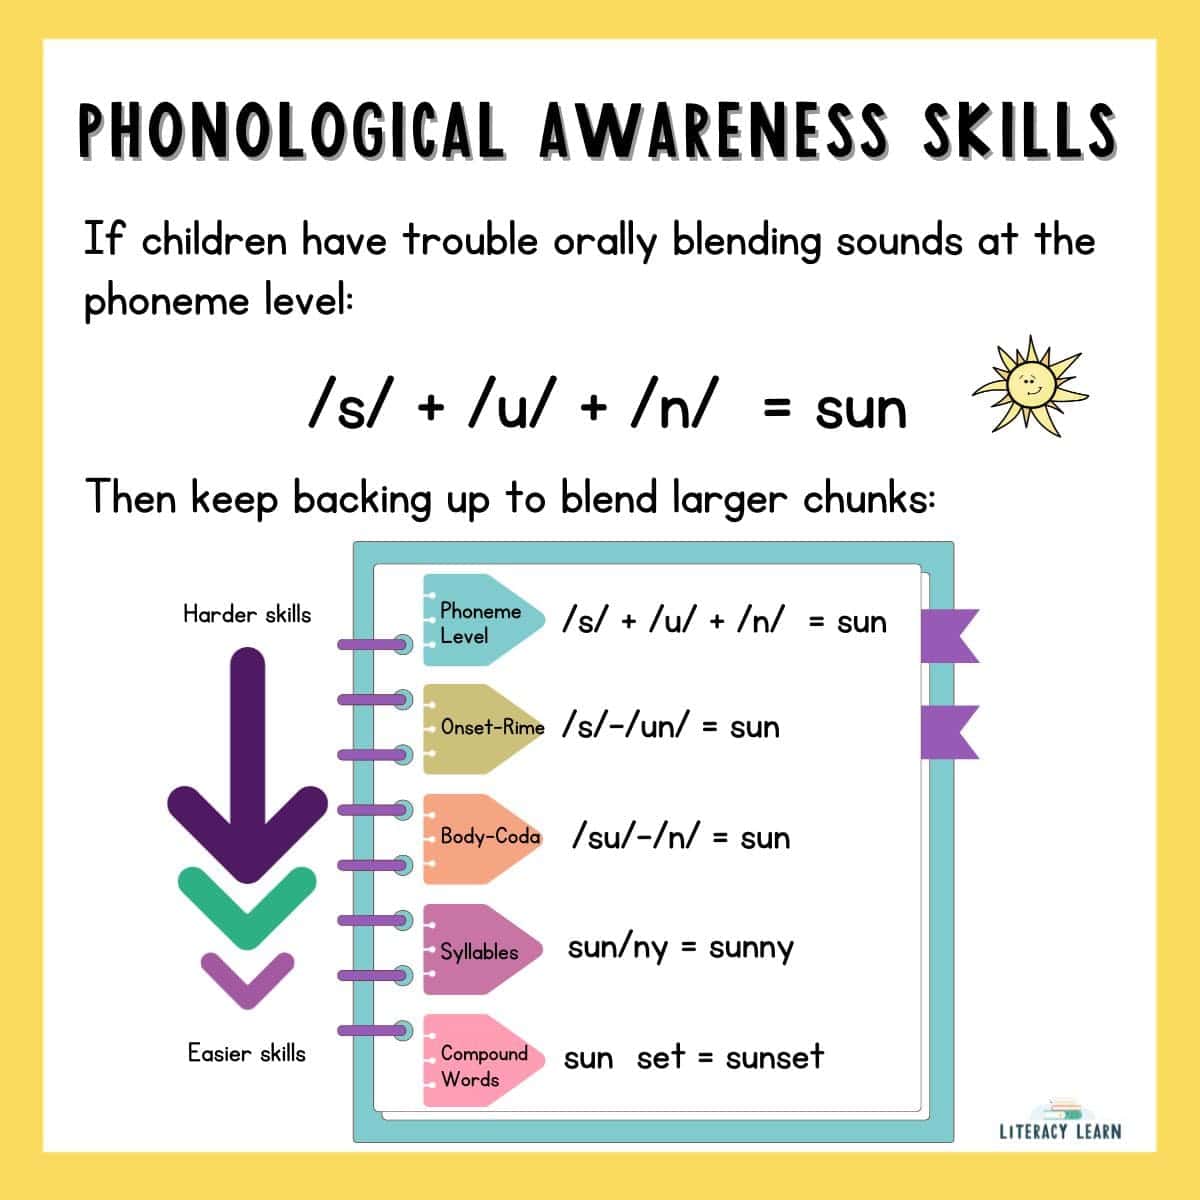
The teacher might say, “I’m going to say a word, but I’m going to say it one sound at a time. Tell me what word I’m saying: /sh/ /u/ /t/.”
Kids should hear the isolated sounds, recognize the word, and say “shut.” If they can’t do this orally, then you’ll know they aren’t ready to try blending written words.
👌🏼 Use the Free PAST test to asses your students’ phonological awareness skills.
Because blending is one of the more complex phonological awareness skills, you may need to back up with your students and work on blending bigger chunks.
Phonological Awareness skills in order of complexity from smallest unit of sound (hardest) to largest (easiest):
- Phoneme-Level: /z/ + /i/ + /p/ = zip
- Onset-Rime: /z/ + /ip/ = zip
- Body-Coda: /zi/ + /p/ = zip
- Syllables: zip + per = zipper
- Compound Words: zip + line = zipline
Provide kids with explicit practice with each phonological awareness skill until they can get to the phoneme level.
Larger units are helpful in developing the foundation, but you really want to get kids to the phoneme level as quickly as possible. Once you’re there, a higher-level PA skill is phoneme manipulation (adding/deleting/substituting). Learn more about this and grab 3 free practice worksheets for phoneme substitution.
Don’t Wait to Teach Blending

As soon as kids know just a few vowel sounds and consonant sounds, you can teach the concept of blending. (Grab our free vowel and consonant worksheets to help kids understand the difference!)
Because the current research is clear that connected phonation is the best blending strategy, use only this approach with fidelity. Use lots of modeling and use real or nonsense words!
When first introducing the concept of blending, start out using continuous sounds (f, h, l, m, n, r, s, v, z) for the initial phoneme, and stop sounds (b, d, g, k, p, t) for the final phoneme. This will make the ‘stretching’ of sounds seamless!
Then, you can begin adding stop sounds at the beginning of words.
Make It Multisensory
Because we’re stretching the sounds, there are many multisensory techniques to use with kids! Some ideas include:
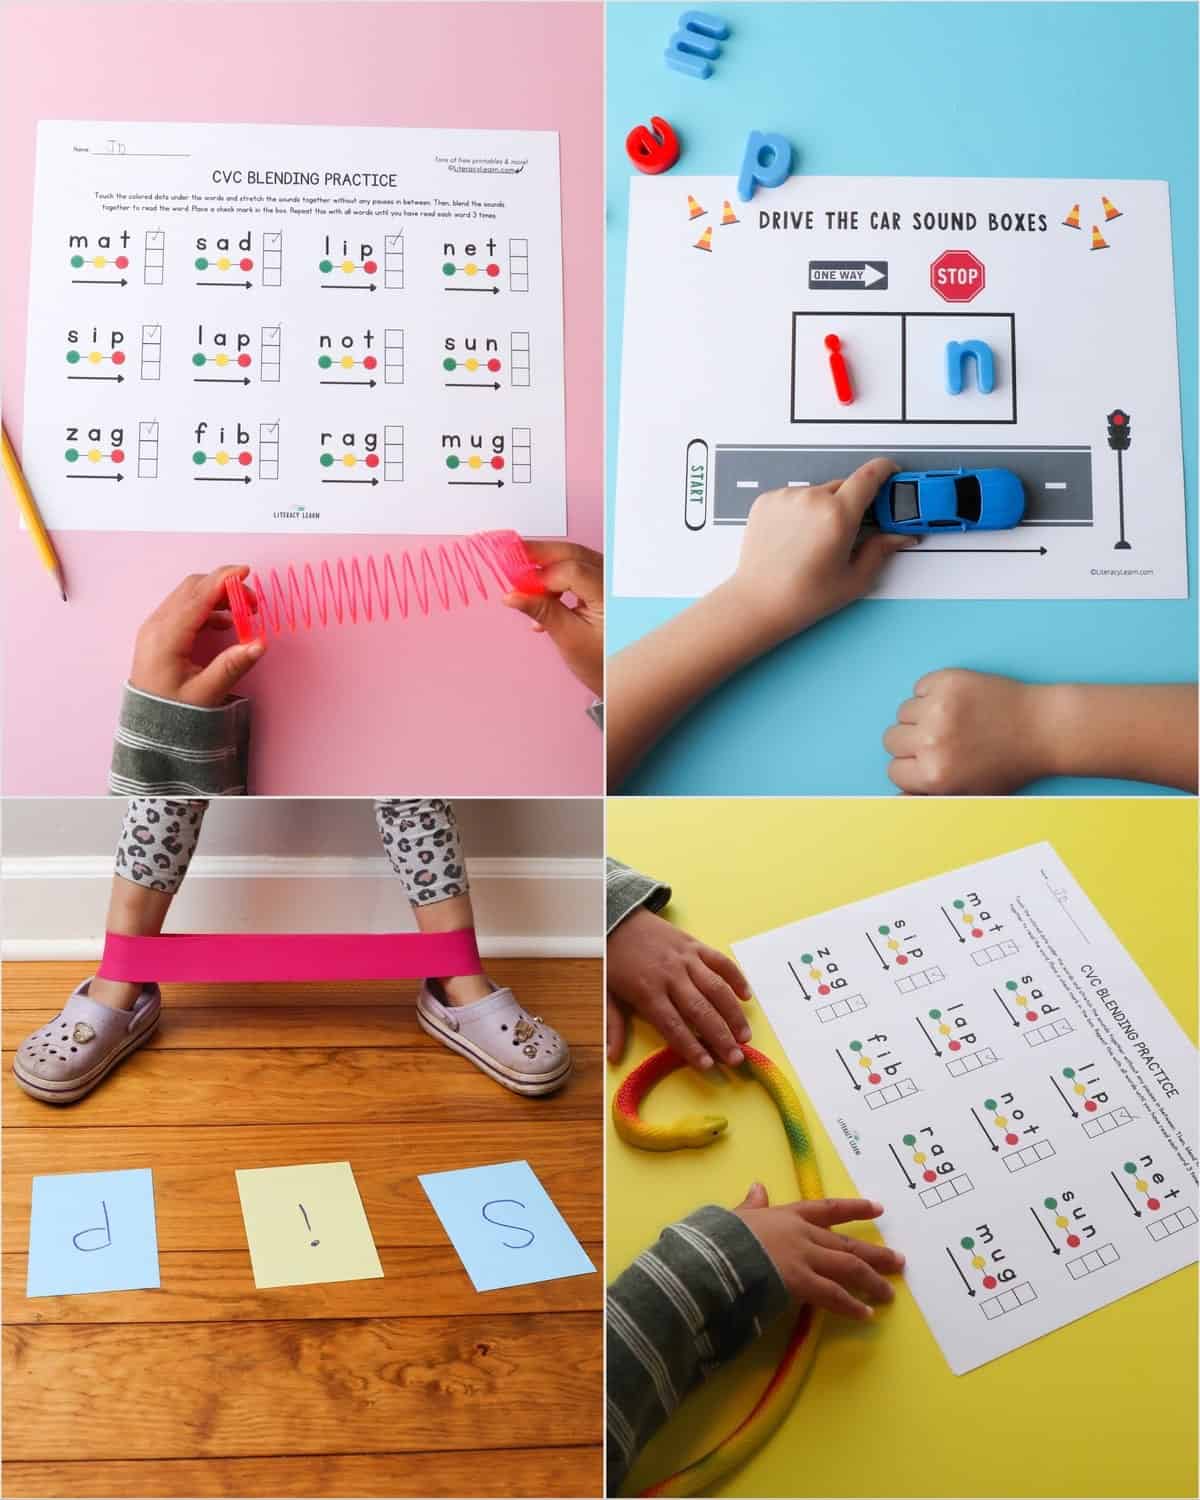
- Blending boards: A blending board is a perfect way to model connected phonation. Place your hand above the blending board as you stretch the sounds continuously.
- Rubber Bands: Using soft, silicone rubber bands, kids can stretch the sounds as they pull the rubber band apart.
- Matchbox Cars: Use matchbox cards along with this car-themed Elkonin box resource, which is a great visual reminder of connected phonation.
- Snake: Give each child a plastic snake and word cards, Children can rub their hand across the snake, moving from left to right, as they make each sound.
- Slinkys: Using slinkys, kids can stretch the sounds to blend the words.
- Stretchy Exercise bands: Kids bands them over their hands or thighs and stretch the sounds as they move the bands apart.
- Use Targeted Resources – Use our free printable worksheet (download at the bottom of this post) which is specifically designed for kids to blend sounds together using continuous blending. You can pair the worksheet with any of the manipulatives listed above.
👉 Check out 25 more ideas for fun, multi-modal, and multi-sensory Orton-Gilingham lessons.
Outdated Blending Technique: Segmented Phonation
Many well-intentioned teachers will use a combination of blending techniques with the hope that kids who are struggling will eventually get the hang of blending. They might try connected phonation, but also include other popular strategies like segmented phonation.
Below, we’ll explain this other popular strategy and explain why we need to steer away from it.
Segmented phonation is when kids separate the sounds. They see an unknown word and use their fingers to tap the sounds, isolating each sound by saying them separately like this:
- /t/ –pause- /a/ -pause- /p/
The problem with segmented phonation is that kids will often forget and leave off the initial phoneme, resulting in an error when blending. Or kids may not have the working memory to hold each sound in the correct order.
So they may come to the word “tap,” segment the sounds, but when they blend it back together they say ‘ap” or “pat.” We’ve all had students consistently do this, right?
🔤 Segmenting sounds is a procedure we want to teach for spelling words. We want kids to separate sounds, finger tap the sounds, and then write the corresponding grapheme.
Elkonin boxes work great for this because they promote orthographic mapping. But this is not the procedure to use when blending words to read them!
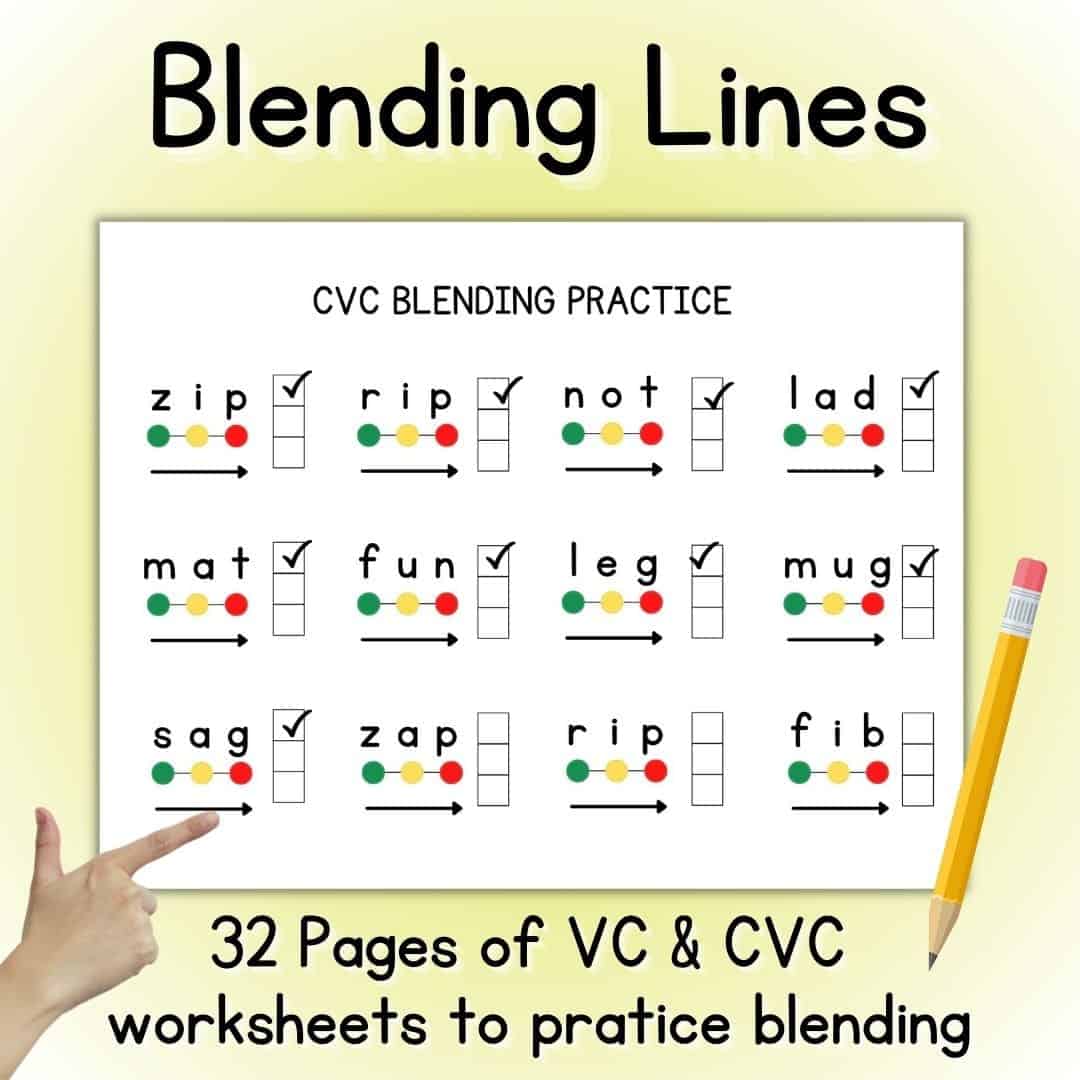
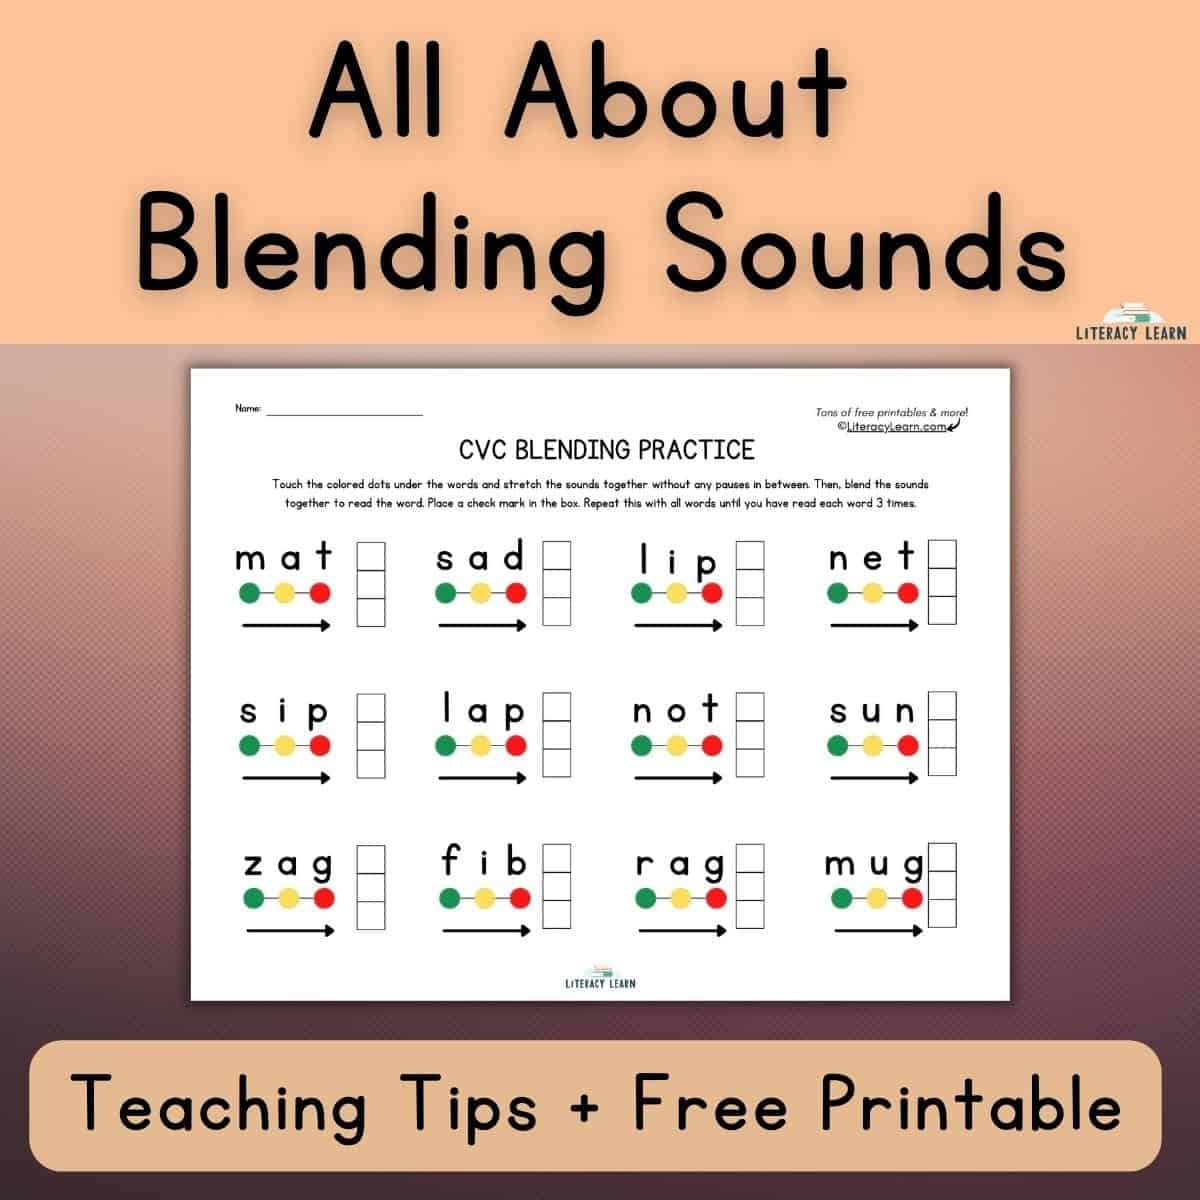
Using the Blending Worksheet
Now that you know all about connected phonation, the BEST way to teach blending, use our free worksheet (download it below) to help kids practice reading words using this strategy.
Kids will follow this procedure:
- Touch the colored dots under the words and stretch the sounds together without any pauses in between.
- Blend the sounds together to read the word.
- Place a check mark in the box.
- Repeat this with all words until they have read each word 3 times.
We designed this printable with continuous sounds as the initial phoneme, to make this tricky skill a bit easier to first learn. This is a perfect resource to use with pre-k, kindergarten, or struggling first grade students who know most of the letter sounds.
Conclusion
As educators, we need to let research and science guide our instructional practices. The knowledge we gain is ever-growing and never static. Evidence regarding the most effective blending technique (2020, 2025) has been found and clearly points to connected phonation.

Recommended Resources
Looking for more CVC resources to help kids learning to read and spell? Get our Ultimate CVC Word Bundle with alphabet arcs, word mapping worksheets, sound boxes, and more!
Download & Print
We love hearing from you! Please comment below or tag us on Instagram @Literacylearn to tell us your best tips for teaching blending.
DOWNLOAD TERMS: All of our resources and printables are designed for personal use only in homes and classrooms. Each teacher must download his or her own copy. You may not: Save our files to a shared drive, reproduce our resources on the web, or make photocopies for anyone besides your own students. To share with others, please use the social share links provided or distribute the link to the blog post so others can download their own copies. Your support in this allows us to keep making free resources for everyone! Please see our Creative Credits page for information about the licensed clipart we use. If you have any questions or concerns regarding our terms, please email us. Thank you!
These are my FAVORITE blending worksheets!! I printed on cardstock, put in plastic sleeves, and the kids use dry erase markers to check off when they are reading. I also let them use those little plastic “phones” so they can hear themselves and not get distracted by the rest of the group. They LOVE it, and often request the activity! The VC ones actually helped my lowest group get the hang of blending and transition to the continuous CVC words. Now they are successfully blending on their own! Your practice sheets are what helped them do it! I think it’s the repeating 3 times that especially helped them get the hang of it. It’s great that you include nonsense words too. My only wish would be that you make more, with digraphs, r-controlled vowels, vowel teams, glued sounds, blends, etc. I would DEFINITELY buy the entire set on Teachers Pay Teachers!! The kids love it, and it works!
Treva,
Wow! Blending can be such a tricky skill for kids to learn. I’m sure it was your fantastic teaching that got your students to be successful, but we are so glad to hear our resource helped too. Keep up the excellent work…and we’ll continue providing resources to help 😉
Katie and Laura