Alphabet Arc: 8 Free Printable Mats & How to Use Them!
This post may contain affiliate links. As an Amazon affiliate, we earn from qualifying purchases.
Get 8 different printable Alphabet Arcs to use with your students! They will help build speed, accuracy, and automaticity in alphabet knowledge, letter recognition, and sequencing.
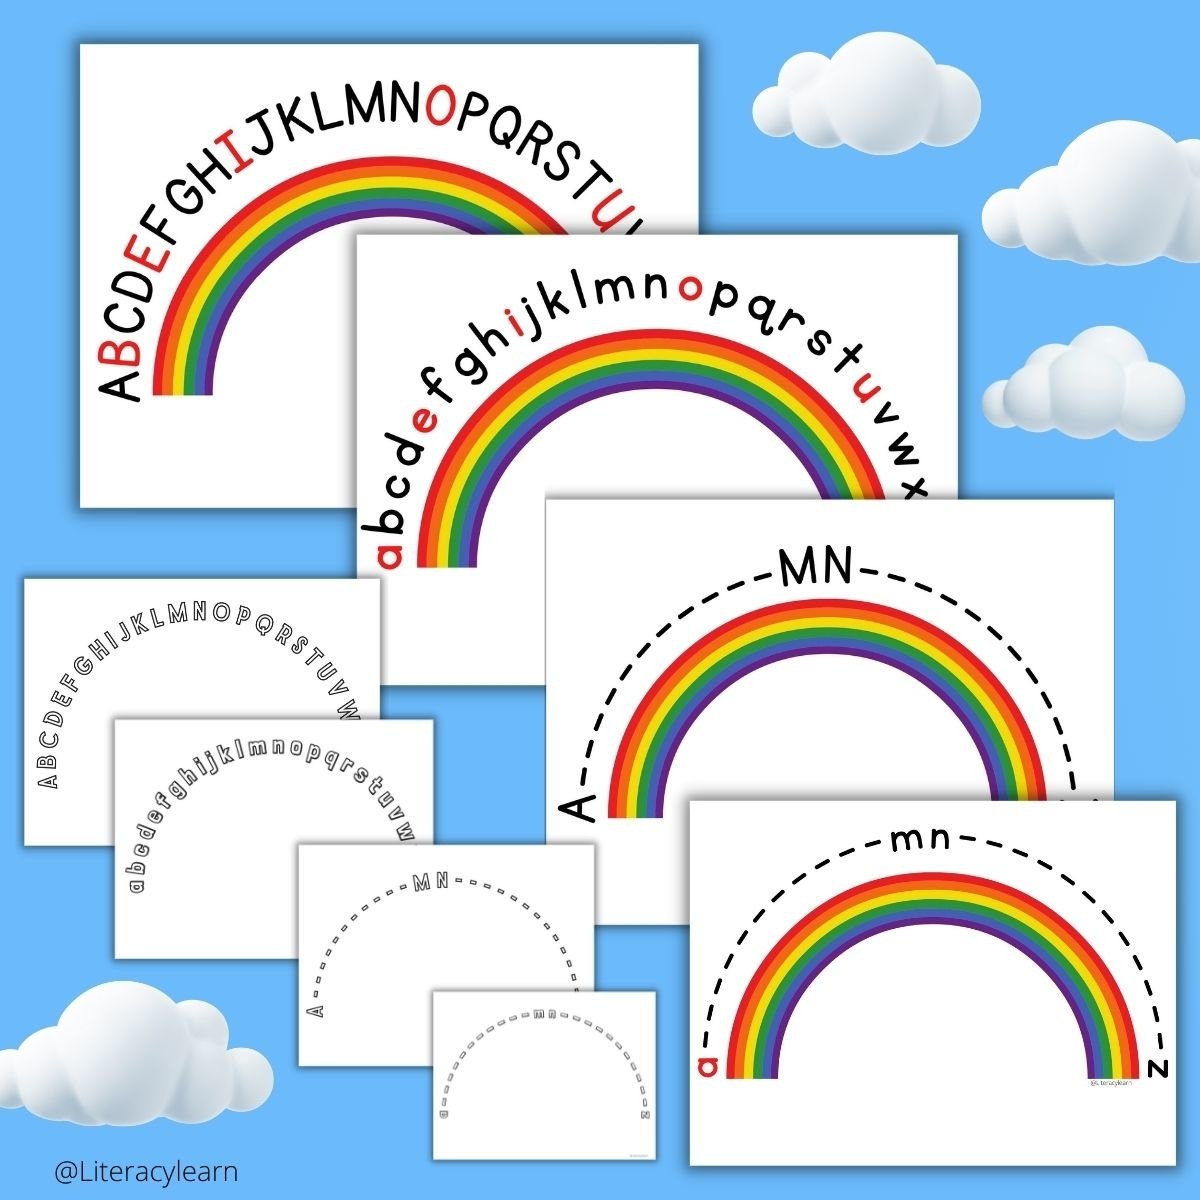
The mats include 4 color & 4 black-and-white versions with either capital or lowercase letters. Some mats include the full alphabet and some include anchor letters A-MN-Z. So whatever supports the needs of your students, you can find it here as a free downloadable pdf!
🔤 What Is an Alphabet Arc?
An alphabet arc is simple! It’s a mat with printed letters of the alphabet formatted in the shape of an arc, or a segment of a circle, just like a rainbow! It includes all of the letters from A-Z or anchor letters A-MN-Z.
Because we want you to have options, we’ve included 8 different alphabet arc printables. So if you’re teaching uppercase or lowercase letters, the entire alphabet, or just a few letters, we’ve got an alphabet arc that’ll suit you and your students!
💡 Why It’s Important
Using an alphabet arc is great for many things! It helps with…
- Letter Recognition
- Sequencing
- Speed and Automaticity
- Alphabet Knowledge
- Visual Discrimination
- Letter Orientation
- Understanding Alphabetical Order
- Building General Sequencing Skills
- Developing Long-Term Memory
- Building knowledge of the alphabetic principle
Alphabet knowledge is essential for EVERY student, including those with learning exceptionalities. Try using embedded mnemonics to help students learn faster!
“Make certain that the child is secure in his knowledge of the letters of the alphabet. The alphabet is the cornerstone for all reading and spelling. Many students with dyslexia may be able to ‘sing’ or ‘chant’ the alphabet, yet they cannot touch and name nor recognize each of the individual letters of the alphabet.”
The International Dyslexia Association Handbook (2019)
✨ Getting Started
👉 Kids can begin using alphabet arc mats once they know 4-5 letters. Keep adding letters to the activity as you introduce them.
👉 It’s important to make this activity multisensory! The more senses that are engaged, the better! Use magnetic letters, letter cards printed on paper, or foam letters.
👉 If you’re just starting to use alphabet arcs with your students, use the mats that include all 26 letters of the alphabet. When you feel like your child is developing automaticity and speed, you can switch to the partial Alphabet Arc mats that only include letters A, M, N, Z. These first, middle, and final letters of the alphabet serve as anchors, or springboards, for the letters that precede and follow.
👉 When using a partial alphabet arc mat, be sure that the entire alphabet is clearly within view so that children have the support they need. Hang an ABC chart or place an alphabet strip nearby the student.
🌈 How to Use Alphabet Arcs
There are many ways to use each alphabet arc. The activities and mats you choose will depend on the current levels, needs, and deficits of your students.
These are the three main ways of using the arcs, including step-by-step instructions to use the mats for letter matching, letter sounds, and word building.
Letter Matching
Begin using an alphabet arc for letter matching since it is the most foundational of all activities. Start with the mat that includes all 26 letters of the alphabet.
Use either the capital or lowercase mat …whatever your preference! Begin this activity once kids can recognize 4-5 letters, and continue adding as you introduce new letters.
What You’ll Need: Alphabet arc with ALL letters, magnetic letters.
👌 Steps for Letter Matching
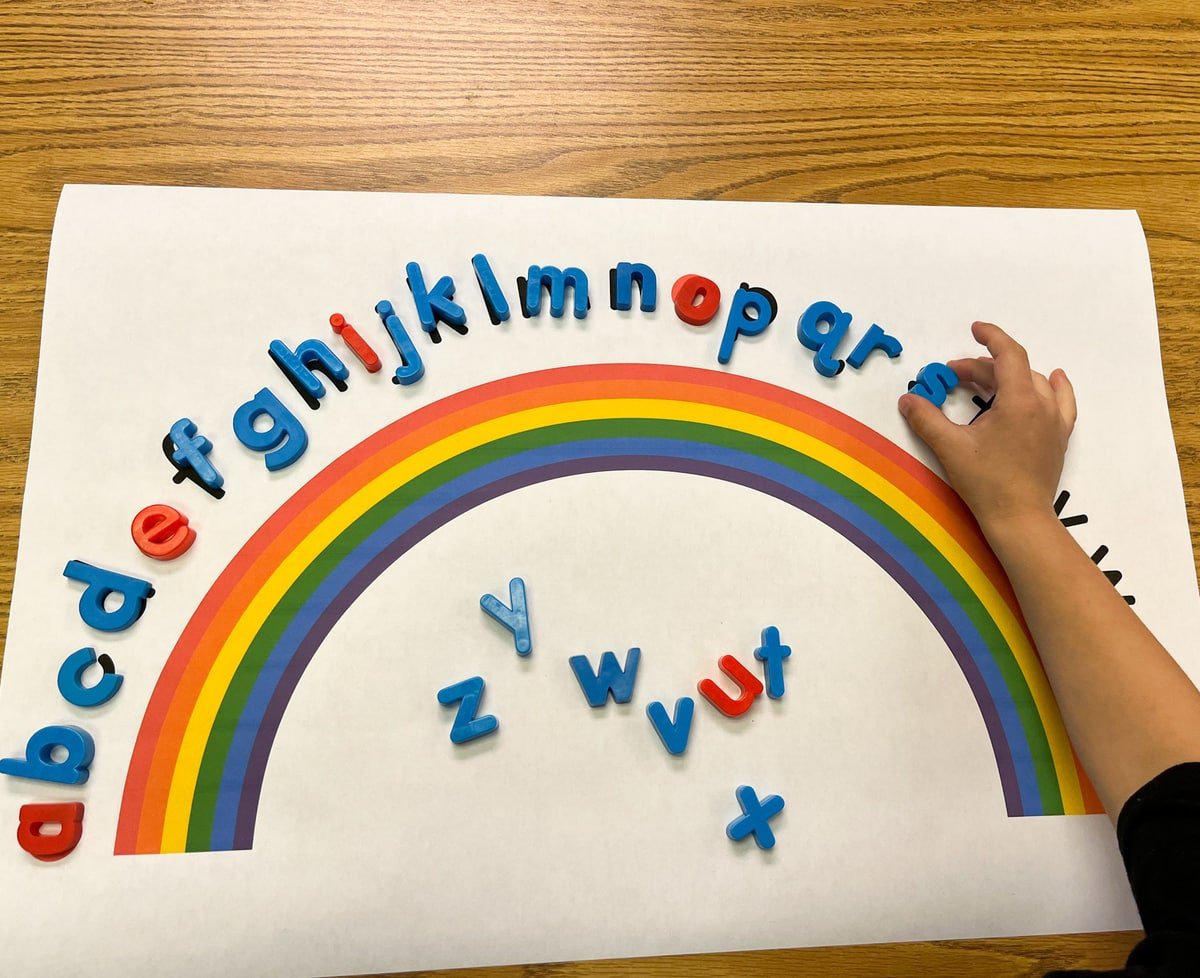
- Place the alphabet arc and magnetic letters on a flat surface. The letters you’re working on should be placed randomly in the middle of the arc.
- Students choose a letter, name the letter aloud, and match it to the letter on the alphabet arc.
- Children continue matching letters while saying the letter names until all letters have been matched, ensuring that the letters are oriented the right way. (Students should try to complete this portion as quickly as possible.)
- Once completed, students should touch each letter (starting with A) and sing the alphabet song. Be sure to sing slowly and work on 1-1 correspondence.
- At the end of the activity, children pick up each letter, say the letter name, and return the letter to the middle of the mat.
👉 When kids can quickly and easily complete these steps with the lowercase or capital mat letter mat, switch to the other. They’ll need to be firm in their letter recognition of both uppercase and lowercase letters.
👉 To extend deeper, provide kids with lowercase magnetic letters and have them match to the capital alphabet arc and vice versa.
Partial Alphabet Arc
Once kids can sequence all 26 letters of the alphabet with minimal support, switch to the partial alphabet arc. Kids repeat the same procedure listed above, but first place the anchor letters (A, M, N, Z) in place.
With the remaining 22 magnet letters in the center, kids work to sequence the letters in alphabetical order. Children can definitely use support as they do this, but you’ll want to gradually get them to the point where they can sequence the letters in the correct order from memory.

Letter Sounds
Letter-sound correspondence is a higher-level skill than alphabet recognition, but it can easily be practiced using an alphabet arc.
This is a great way to take an already-familiar activity and go deeper to help reinforce letter sounds. Be sure you only include the magnetic letters that have been explicitly taught for letter sounds.
What You’ll Need: Alphabet arc with ALL Letters (laminated), 26 magnetic letters, dry erase marker, eraser.
👌 Steps for Letter Sounds
- Place the alphabet arc and magnetic letters on a flat surface. Place the magnetic letters in the blank space in the center of the mat.
- Children quickly match the magnetic letters to the letters on the alphabet arc, saying the letter names as they match them on the arc.
- Once all letters are matched, the Teacher says: “Find the letter that says /m/.”
- Children repeat the sound /m/, then search for the letter on the arc.
- The child pulls down the letter that makes that sound. As they pull the letter down, they should say the letter name and sound: “M says /m/.”
- Kids then write the letter using a dry erase marker on the laminated mat, using proper letter formation.
- The teacher checks the letter and the student returns the letter back to the match on the arc.
- Repeat this process to practice multiple letter sounds!
Word Building
To go even deeper, children will use the letters on the alphabet arc to spell words. This activity should be used after kids can sequence all 26 letters quickly and effortlessly using the partial alphabet arc.
They should also be able to segment sounds into individual phonemes (mat –> /m/ /a/ /t/). Children should know most letters and sounds (If not, that’s okay! Only choose words that include the sounds they know).
Since all of the magnetic letters will be in the shape of an arc for this activity, it will leave the entire middle space open for word building with magnetic letters.
What You’ll Need: Partial Alphabet arc, 26 magnetic letters A-Z, Elkonin boxes OR sound lines drawn on the mat.
👌 Steps for Word Building
- Place the partial alphabet arc mat on a flat surface.
- Children sequence all letters in order on the arc, using support as needed.
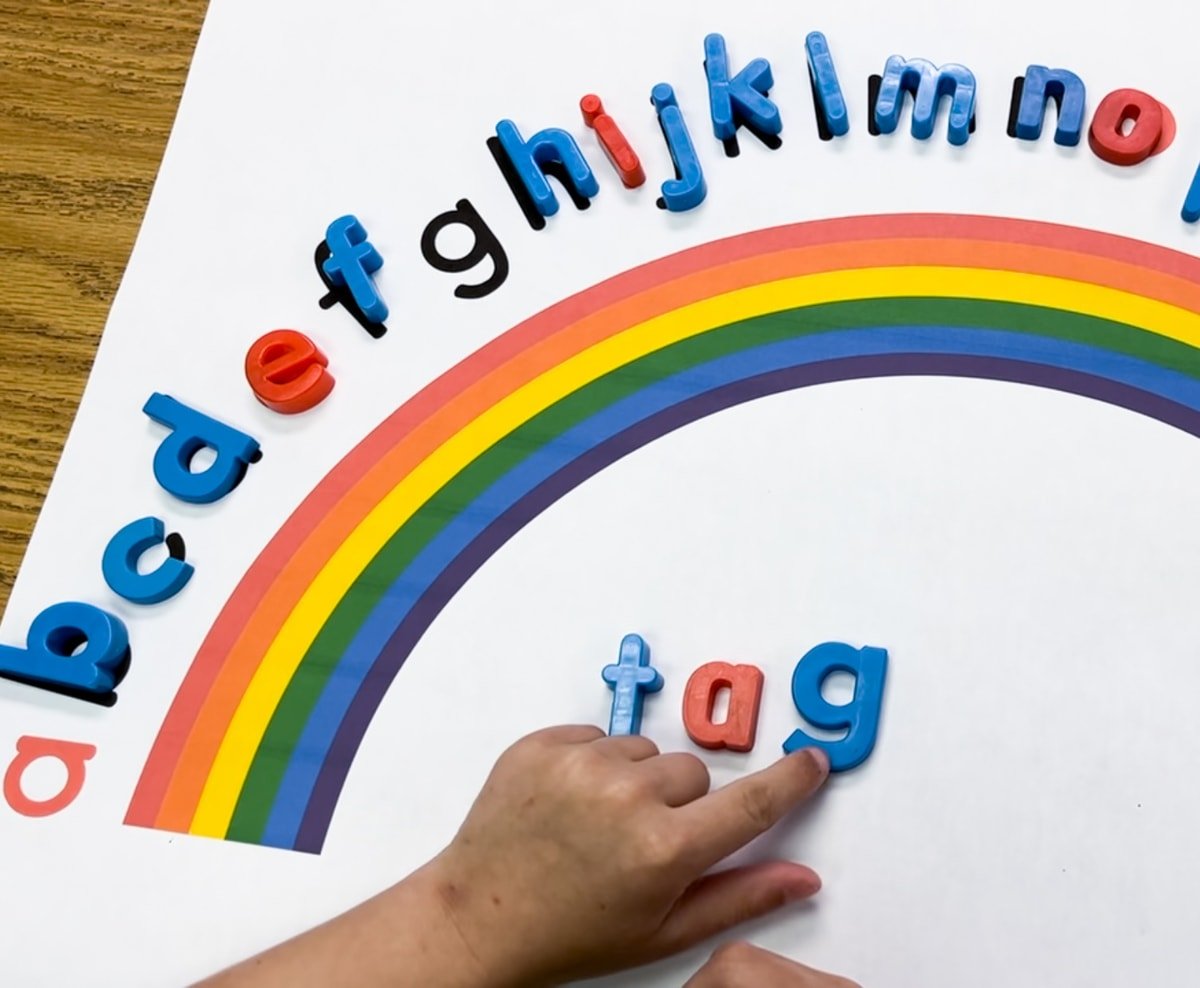
- The teacher dictates a word that follows a CVC pattern.
- Children repeat the word, then finger tap the sounds. Suggestion: You can draw Elkonin boxes or write sound lines in the middle the arc.
- Kids listen for and then locate the letters that make each sound, pulling down the letters starting with the initial, then medial, and final sounds.
- Once the letters have been pulled down to the center of the mat, children check their work. They touch under each letter, making sure the letter they see matches the sound they hear in the word.
- Children blend the word together, running their fingers under the letters and reading the word quickly.
- Children should return the letters to their match on the arc and repeat the process with a new word.
✨ Tips & Ideas
- Enlarge and print the arcs on 18×24 paper. The magnetic letters fit PERFECTLY with this size.
- Print in color and laminate for extra durability.
- Use a timer! Have kids keep track of their time to see if they can ‘beat the clock’ from the last time!
- Keep ziplock baggies with the letters you’re working on for daily practice. This makes set-up and clean-up easy!
- Use with Pre-k, Kindergarten, 1st and 2nd Grade students.
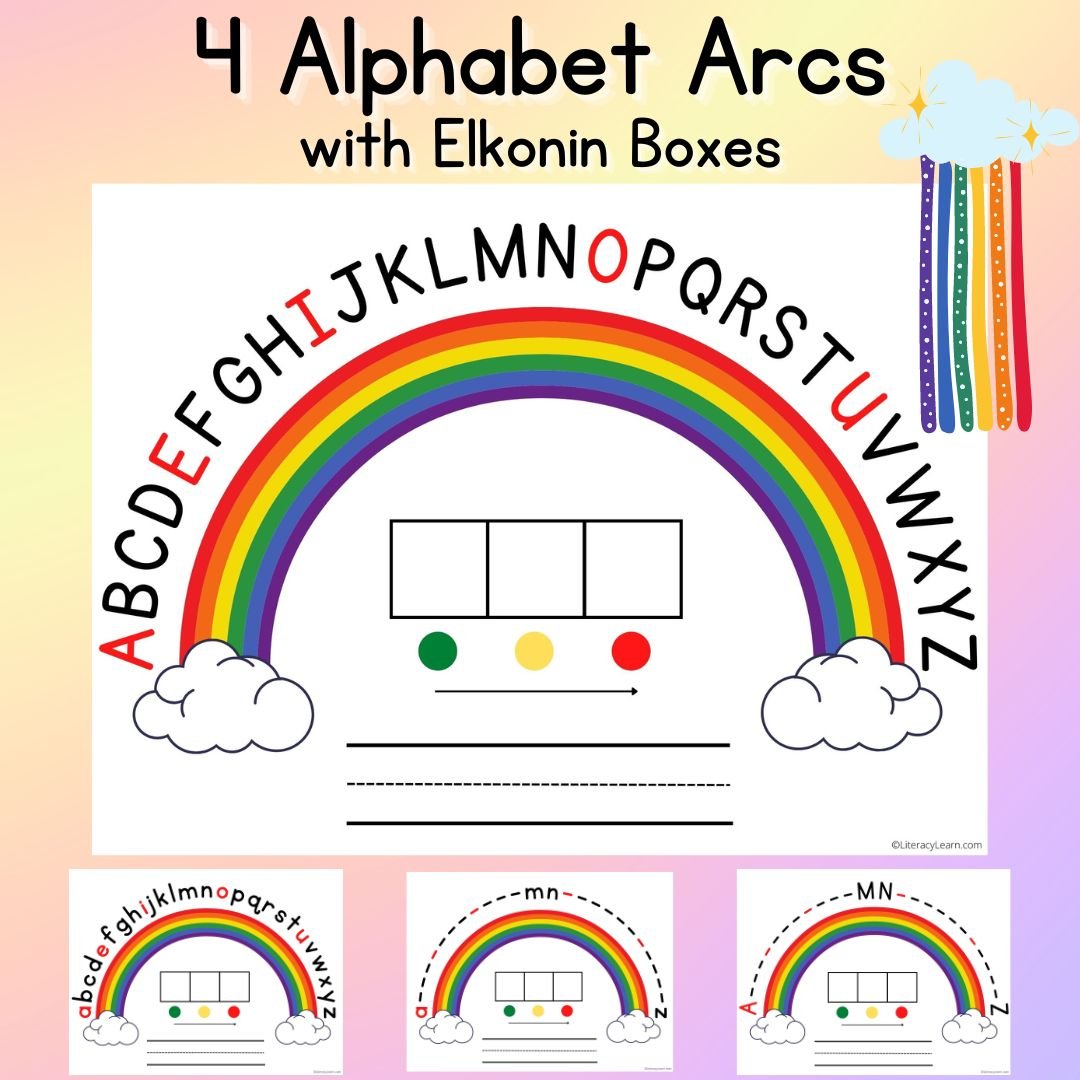
Upgrade available! Visit our TPT store to get the version with Elkonin boxes and text lines, or keep scrolling to download the free version!
Real-World Teaching Experience
I’ll never forget coming home from my first Orton-Gillingham Classroom Educator training and jumping right into it. At the suggestion of the OG Fellow who taught my class, I began by assessing my students’ alphabet knowledge.
At the time, I was working with a group of five 4th grade students who were reading below grade level. I gave them a blank piece of paper and asked them to write the letters of the alphabet with letters A-M on one line and letters N-Z on a second line. I never would have guessed what would happen next!
4 of the 5 students (80%) could not write the alphabet. Two students struggled with the sequence of letters, with a few out of order and a few letter reversals. Two students had such large deficits that they could not complete the task.
Only one fourth-grade student could properly write all of the letters of the alphabet in the correct sequence. None of these students had a documented disability, but it was crystal clear that there were giant gaps in their alphabet knowledge.
Since that moment many years ago, I’ve been dedicated to ensuring that my students have a solid foundation in letter knowledge. Using alphabet arcs has been one of the most impactful practices for establishing this ‘cornerstone’ needed for reading success.
More Alphabet Resources

Embedded Mnemonics have been shown to help improve phoneme-grapheme correspondences! Get our Mnemonic Alphabet Arc (and more!) from our TPT shop or LL Unlimited.
🖨️ Download & Print Options
DOWNLOAD TERMS: All of our resources and printables are designed for personal use only in homes and classrooms. Each teacher must download his or her own copy. You may not: Save our files to a shared drive, reproduce our resources on the web, or make photocopies for anyone besides your own students. To share with others, please use the social share links provided or distribute the link to the blog post so others can download their own copies. Your support in this allows us to keep making free resources for everyone! Please see our Creative Credits page for information about the licensed clipart we use. If you have any questions or concerns regarding our terms, please email us. Thank you!
We’d love to hear about your experience using these printables! Please leave a comment below or tag us on Instagram @literacylearn.
Staples is charging me (w/tax) $19.99 for one 18×24 poster. Am I doing something wrong or is this about what it costs to print on 18×24? Never did it before.
Hi! I’m not sure about current pricing but that doesn’t sound outrageous to me. Do you work at a school that has a color printer? That’s usually a free option.
I love this! I’d like to send it for printing this weekend but am wondering about the size of the Arc as well as the size of the magnetic letters. If you typically enlarge to 18×24 (which seems big for a K space?) what size magnetic letters do you use? Would 12×18 work for the smaller magnetic letters? Your suggestions are most helpful. Thanks in advance.
Hi Dierdre, We’ve seen them printed that size and seem to work with the smaller magnetic letters, but we haven’t done it ourselves. If you do print 12×18, please come back and let us know how it works with the small magnetic letters. I’m sure it’d be helpful for other teachers to know! 🙂
I love these, too, but my print option only shows the ability to print one-fourth of the graphic. No option to print tiles and put it all together. I’ve tried other settings…no luck. Any suggestions? I’m trying to print the lower-case alphabet arc in color.
Thanks so much!
Hi Liana! We recommend enlarged poster-sized printing, but if you’re planning to print on multiple 8.5×11 pages, open the pdf in adobe reader (it’s free) and select the poster option for printing. Hope that helps! 🙂
Can you share a trick that will enlarge the lower case color alphabet arch? I would like to make it bigger so my foam letters will fit?
Hi Pam!
We suggest sending the PDF to a printing store like UPS. The dimensions shown in the picture are 18X24. They should be able to enlarge to whatever dimensions you’d like!
Best of luck!
Katie and Laura
Could I get the files e-mailed separately also to send to our printer? Can’t wait to use with my resource kiddos.
Jill,
You should be able to download all of the pdf files. You can find them at the bottom of the post. Just click the “Download” button and the pdf will download right to your computer!
-Katie and Laura
Hi Katie
I cannot get the arcs to print? I have to scale them to 40% for them to print. I am ok with them being on two sheets of paper and I can tape them together to create 1 big arc. When I try to print on 100% I cannot get the whole arc. Please help.
Kjohnson@morganschools.org
Thanks
Hi Kelly! We recommend enlarged poster-sized printing, but if you’re planning to print on multiple 8.5×11 pages, open the pdf in adobe reader (it’s free) and select the poster option for printing. Hope that helps! 🙂
Hi! I love this resource! Thank you for making it available. I’m attempting to upload the files to an online printing business for ordering them in 18″x24″ poster size. Because there are two pages in the PDF file containing both the capital and lowercase letters, it looks like they will only print the first image in the uploaded file. Does anyone have suggestions for a not-tech-savvy person?
Hi Debra! I’m so glad it’s helpful. I’ll email you the files separately so it’s easier to print using that service. 🙂
Hello! Please send the individual file to me, as well. I would like the lower case full alphabet in color version. Thank you!!!
Deanna,
We just sent it! We hope you enjoy using it with your students.
-Katie and Laura
Do you use these with magnetic letters? Nothing comes in 18 x 24 inch size. Regular cookie pans are too small.
Thanks!!
Hi Deanna,
Yes, we can use them with magnetic letters but don’t use any cookie pans underneath. So technically the magnetic letters don’t stick to anything, but it makes it easier for kids to manipulate the letters quickly. We hope this will work with your students as well.
-Katie & Laura
I love this resource. I will be teaching TK next year and would love to use them. I tried to download and it said file can’t be opened. Is there a way for you to send them to me?
I am so glad to hear you can use these with your students. Sorry for the inconvenience. We just checked and the links are working for downloads. But I will send them via email now 😉
-Katie
I love these! Can you tell me how much to enlarge to fit on 18×24? I don’t want to waste color ink by experimenting.
Hi Laurie,
We’re so glad you love them! Unfortunately, we’re not sure about specifics for enlargement. We use UPS for printing, and just tell them we want them printed on 18×24. We hope you get it right the first time!
Katie and Laura
I love this and am so excited to use this with my students!! … Thanks so much for creating this and sharing it!!
Please help me understand the why some letters are red. At first I thought it would be the vowels, but the upper case B is red.
Hi Lori! It is the vowels. The earliest version of the printable had a minor error on the full alphabet (the red b) but it’s since been fixed in the file you download! 🙂
I can’t wait to use these with my students. Great freebie!
We’re so glad you can use them! Your students will benefit from using these along with your instruction!
– Katie and Laura
I am so excited for your new series. Love this freebie. Can’t wait to bring this into my guided reading and centers.
Thanks, Malynn! Let us know how to goes using this in your classroom! – Katie and Laura
This are amazing
We’re so thrilled they’re helpful resources for you and your students! 🙂